The Carburettor
We have given this job a two spanner rating, as if you follow the instructions step by step this is pretty simple. The most important thing to remember is jets are made of brass and are delicate, do not clean them out with metal objects as this will enlarge the hole in most cases. Tools you will need an exact fitting screw driver for the jets so no damage is caused, suitable cleaning material, either petrol or Carburettor cleaner, and a toothbrush is an ideal tool for scrubbing jets.
Jetting details can be found here.
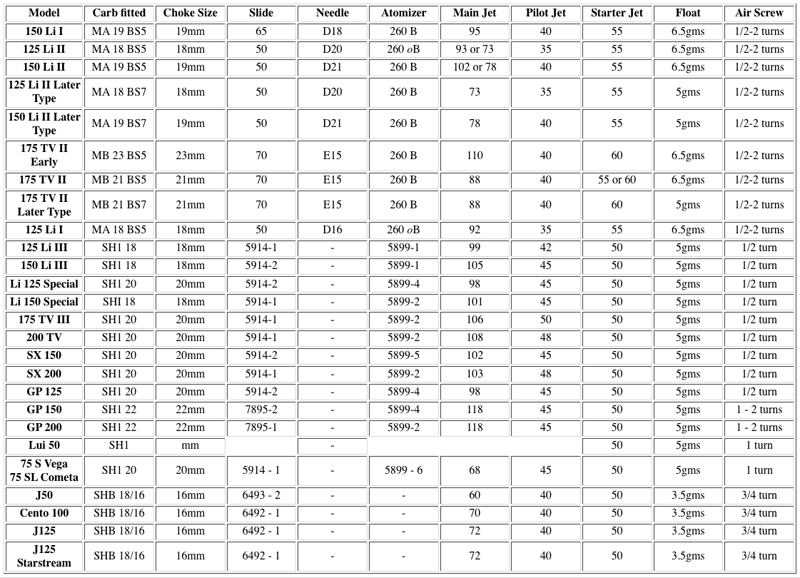
The table is a guide to Innocenti recomendations as to factory jetting specs. Please dont forget as with any modifications, changes in the machine over the years will affect jetting.
| SH standard Lambretta Carbs 1) Bolt 2) Fibre sealing washer 3) Inlet banjo 4) Banjo sealing washer 5) Filter 6) Bolt for clamp 7) Clamp 8) Washer 9) Throttle arm pivot bolt 10) Idle adjustement screw 11) Throttle arm 12) Spring 13) Sealing washer for throttle rod 14) Carburettor top 15) Return spring 16) Slide 17) Sleeve 18) Starter jet 19) Float needle 20) Float pin 21) Nut |
22) Throttle rod 23) Rubber cap 24) Carb top screw 25) Adjuster lock nut 26) Cable adjuster 27) Float bowl screw 28) Carb body 29) Air mix screw 30) Air mix spring 31) Atomiser jet 32) Pilot jet 33) Main jet 34) Float 35) Float bowl seal 36) Float bowl 37) Choke cable adjuster 38) Adjuster lock nut 39) Choke top 40) Choke return spring 41) Choke valve |
The Carburettor Re-Build
Stripping and rebuilding a standard Lambretta dell'orto carburettor is a fairly easy task, if you take your time, as the carburettor itself is fairly basic. Most of the items to worry about are housed in the lower float bowl section, these include, pilot jet, starter jet, main jet, etc. For those of you that have some technical knowledge, you may find the instructions too simple, but this guide is to assist those with no knowledge and so are basic!
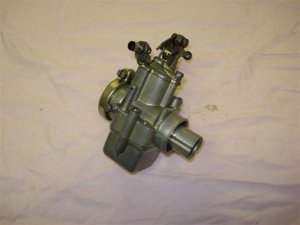
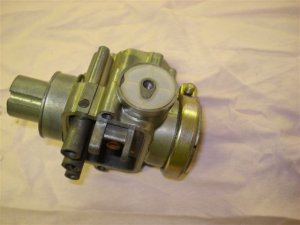
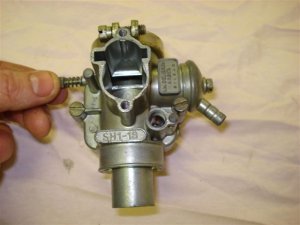
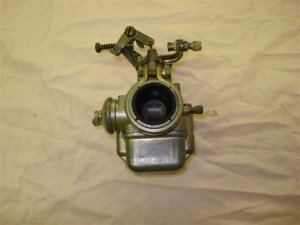
These set of instructions apply to all series three carbs, the SH18, SH1/20 and SH2/22 as seen on the left. Normally there will be an 8mm bolt to undo to release the carb from the manifold. Undo this, it is behind the carb itself. Next release the throttle cable nipple from the arm. Unscrew and take off the air hose. A 10mm spanner will be needed to undo the choke housing. Pull the choke assembly out in one go. The carb can now be tapped, and I mean tapped carefully, from the other side of the scooter so you're tapping at the back of the carb, with a block of wood or similar. Take care not to damaged the rear of the carb. You may need to increase your force to remove the carb, but be careful.
You should now have your carb in your hand ready for action!
I am going to presume that you can operate a screwdriver, if you can handle that you can strip and rebuild your carb! The only thing to remember is to make sure your screwdrivers are clean, but more importantly they fit the jet exactly, ill fitting screw drivers noly cause damage, and thus you wont be able to set up your scooter properly.
There are two screws to undo that will release the top of the carb, when you have done this the cable holder adjuster block, along with the carb slide assembly will come out. Leave this assembly together, as we only need to clean this section, and you can get to all parts as is! Just inspect the slide to see if there is any damage.
Fuel banjo (where the fuel enters) is the next thing to take off, just unscrew it, and then remove carefully the small filter
The Float bowl screws are slightly lower than the two screws you just took out to remove the top. Undo these and the bowl will fall away. Note there will be petrol in here so be careful not to spill it over you dinner jacket (well I dress up to strip my scooter anyway!)
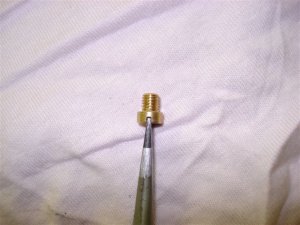
Undo the three brass jets you can now see with the carb turned upside down. Use the best fitting screw driver you have a yes brass is softer than your steel screwdrivers, so the jets will come off worse if you force them
there is a small pin that holds the actual float in position, a small pair of pliers should be enough to "wriggle gently" the pin out. The bowl will now be free, but note the float needle sits in there so do not loose it!
Unless I have forgotten any thing, the last part to dismantle is the air mixture screw on the side of the carb. It will be a screw with a spring on it. Just unscrew it! If you are unsure of any of the above, just look at the instructions below for re-fitting, and work backwards!!!
OK your stripped, I hope no one is watching!
Right clean everything in sight, and I mean clean and everything, some people can cause more problems, and make the carb dirtier than before they started. I start my rebuilds with clean hands, they stay this way right to the end!!!! Carburettor cleaner can be purchased in most motorist's shops, it is really good for shifting oily deposits that can build up as time goes by. Failing this a good soaking in neat petrol will be the next best thing. Never poke the jets through with metal wire, or other such hard surfazces as you will damage and enlarge the delicate brass jets. Use suitable carb clearner, and compressed air is very good for blowing through the jets as well.
We should presume that your carb is standard and that all jet sizes are correct to your machine. Next project is to upload all the corresponding sizes etc., for all machines, I shouldn't be to long with this so sit tight. There is no real set order for re-building the components, just as long as they all go together in the correct places. Do not over tighten any BRASS jets (yes they all are) you are fitting as they will damage first. They all just need to be "nipped up" with very little pressure, if you do go wild you will damage and or break them.
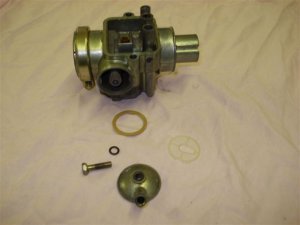
The fuel inlet parts, filter, banjo, bolt, and two gaskets
First push the filter into the carb body as shown in the picture. Dell'Orto filters have a pear shaped hole in the middle, Jetex have a square hole, they are not interchangeable.
The larger inlet gasket fits around the outside of the banjo.
Fit the banjo, some have a peg and hole part to line them up, others do not. For the carbs that do not, make sure your inlet pipe is positioned at the angle shown on the photo, this will stop the lug from catching on the engine mount!
Just before you fit the float bowl, you can now blow through the banjo you have fitted (where the fuel enters the carb) and push the float open and shut to make sure the needle is working correctly, i.e. when the float is hanging down you can blow, and when you push the float up, you now cannot!
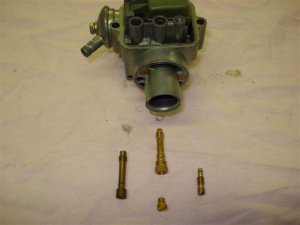
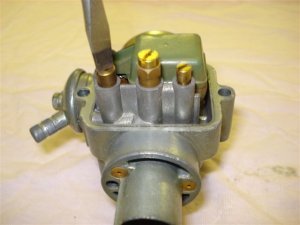
The base of the carb is where most thing happen, the picture shows the bare cab with the jets corresponding to what positions they are fitted to. Left is the choke jet, the long one in the centre is the atomiser, underneath that is the main jet. The atomiser has thread in the bottom of it to which the main jet is screwed in. On the right is the pilot jet.
There are four sizes of atomisers, 5889-1, 5889-2, 5889-3 and 5889-4. Majke sure you fit the correct one to your set up, as most of your riding is probably done on the atomiser, as this works from roughly 1/4 to 3/4 throttle. One tip on tuned machines, it is sometime prefferable to drill the bottom of the atomniser (more so on Jetex atomisers) if you need a richer mid range. Start by drilling to 2.00mm, if you still need more fuel, 2.5mm
Fit the main jet into the atomiser again check you have the correct size for your model, they range from around 70 something up to 122 in standard format, but you can get higher if you have a tuned scoot.
The pilot jet, along with the air mix screw controls tickover, and the first section of throttle, most standard Lambrettas use from a 40 to 50, there is a chart at the bottom of this page so you can cross reference your size.
The choke or starter jet which is the longest one, is always a 50, it rarly wears out, so you could re use your old one when cleaned up, unless you can see visible damage.
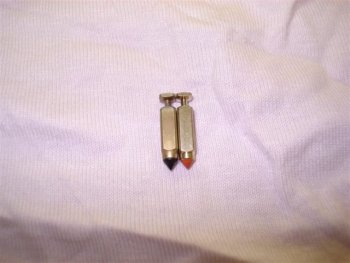
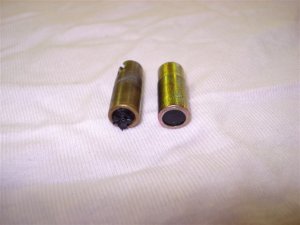
This picture shows two float needles, the left hand one is a Dell'Orto standard needle, the red tipped one is one for use with unleaded fuel. Just check the hieght on the float needles, there are a few on the market that are not tall enough and allow the carb to flood. This mainly happens when you mix Dell'Orto and Jetex needles, but there are some others on the market!
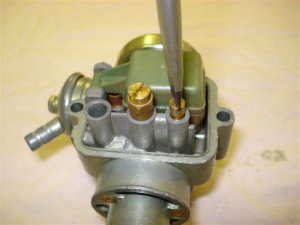
Fit the float needle into the float groove
Fit the assembly to the carb
Fit the float pin now, it has a grooved end, this groove fits last. It is a push fit. Once that is done, you can fit the float bowl itslef, using a new gasket or seal.
If you changed your slide can see quickly how it goes back together in the following pictures. slide the slide onto the slide arm
and then fit the spring on the round housing at the top and into the round housing in the carb top. Once you have this in the correct position, the whole assembly can go back into the body of the carb, and be screwed down.
Once you have this in the correct position, the whole assembly can go back into the body of the carb, and be screwed down.
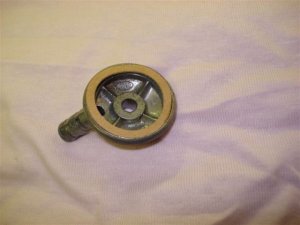
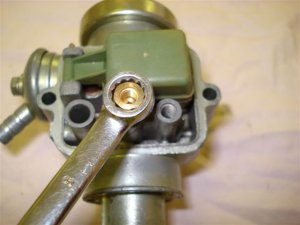
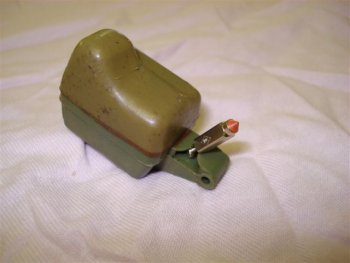
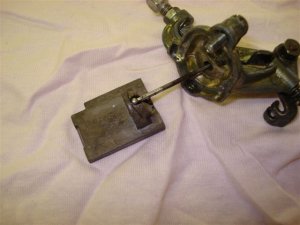
Always pay attention to the choke valve as this can easily be missed. On the base of the valve is a rubber tip, this creates a seal with the choke jet, so when the choke is off it cannot seep extra fluid through. If you look at the photo, the valve on the left is quite old and worn and caused poor running on the carburettor, resulting in the owner unable to set up the scooters running correctly.
All we have to do now is put the carb back onto the scooter. Tap the carb back onto the manifold, do not use a metal hammer or other hard surface when refitting, the soft alloy body of the carb is easily damaged. If you cannot use a rubber hammer, using a piece of soft wood, rubber or similar should be put on the carb first, tap until the carb will go back nor more! Fit the throttle cable back on, then with taking notice how the carb is standing perfectly upright, tighten the 8mm securing bolt at the back.
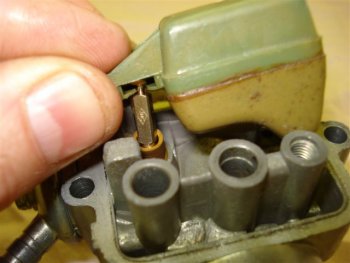
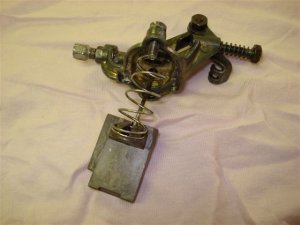
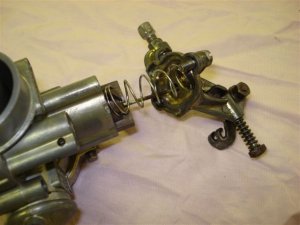
The next two photo's shows how to re-fit the choke valve if you took it off. Slide all components together, elbow, adjuster, block, and then the spring, force the spring to compress with your finger nails, and slide the choke valve into position. The assembly will then hold itself together while you re-fit I into the carb body.
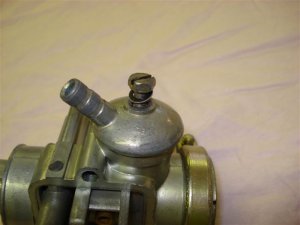
The Final set up!
The throttle cable should have no play in it, that is as soon as you turn the throttle grip the slide should be going upwards also. The other side is that the slide should be able to sit fully down, without the throttle keeping it up! Where the outer cable stops, is an adjuster, screw this inwards or out wards to gain the correct adjustment. If you notice in the picture there are two small holes either side of the air inlet large hole, the one on the left, is where the choke valve sits. Look through this hole and make sure that when you turn the choke on, the valve does lift up, adjustment is by the screw at the top of the housing where the cable goes in. Final things is to get the scooter warmed up by riding around the block a few times, and adjust the tick over. This is done by turning the screw where the inner cable sits at the back of the carb near the fuel tap. Adjust it to your desired position, rev the scoot a little and see if all is well. The perfect idle speed will be where the scooter is just about running but does not stall.
Typical problems and cures
• Engine cuts out
• Main jet blocked, Tap or tap filter blocked, Carb filter blocked, Air inlet in tank filter cap blocked, Water in fuel, Float chamber filled with two stroke oil (caused by not turning fuel tap off). Possible ignition fault also
• Engine will not tick over unless choke is on
• Pilot jet or pilot feed passage is blocked, Pilot air screw not adjusted correctly, Worn throttle slide, Carb top loose
• Engine ticks over but will not rev
• Throttle cable broken, Throttle slide detached, Silencer blocked, Ignition fault
• Engine "4 Strokes"
• choke on or stuck on, Choke cable to tight, Air scoop under seat blocked, Air filter needs replacing
• Engine misses or backfires
• Dirty or faulty spark plug, Air hose detached or split, Air filter missing. See also faults for engine cuts out.
• Engine will only run with choke on
• Crank case oil seals blown, Main jet blocked, Air filter missing, Hose split or missing
• Engine will not start when hot
• Float needle needs replacing, Throttle slide worn, See also faults for 4 stroking
• Engine smokes
• Too much oil in your petrol, Drive side oil seal blown allowing oil to leak into crankcase, Choke stuck on
• Engine will not switch off when hot
• Overheating (need decoke), Wrong grade of spark plug, Engine running weak - air filter missing other air leak at manifold or carb top, Exhaust pipe loose
• Throttle does not open fully
• Incorrect fitment of slide spring, fuel tap interfering with carb tie rod ass, Throttle cable detached at handlebar end.