LCGB Forums

The ability to post messages is restricted to LCGB members. Any questions contact us at lcgbadmin@googlemail.com

Liberty - 1961 series 2 LI 125

LAMBRETTA ONLY PLEASE
Show your Lambretta off to us all with pictures of your pride and joy.

Re: Liberty - 1961 series 2 LI 125

Postby soullad » Thu Oct 16, 2014 3:46 pm

Matt
PM me your address and I'll send you something that will help with the engine rebuild ;)
Ian
soullad
 
Posts: 230
Joined: Sun Jun 01, 2014 8:34 pm
Location: Flying 8 Balls SC. Norfolk

Re: Liberty - 1961 series 2 LI 125

Postby pazwaa » Thu Oct 16, 2014 6:29 pm

soullad wrote:Matt
PM me your address and I'll send you something that will help with the engine rebuild ;)
Ian


Cheers Ian, pm sent. ;)
pazwaa
 
Posts: 59
Joined: Fri May 30, 2014 8:13 pm

Re: Liberty - 1961 series 2 LI 125

Postby pazwaa » Sun Oct 19, 2014 5:28 pm

Found it Toddy, but thanks for the reminder :lol:

Image

Better do some reading!!

Photo of the finished workshop/kids playhouse/storage facility

Image

Hopefully get it back early next year and bring Liberty home ;) meanwhile engine off Tuesday.
pazwaa
 
Posts: 59
Joined: Fri May 30, 2014 8:13 pm

Re: Liberty - 1961 series 2 LI 125

Postby Toddy » Sun Oct 19, 2014 5:32 pm

Happy days ;) liking the workshop
User avatar
Toddy
 
Posts: 10223
Joined: Tue May 13, 2014 9:58 pm
Location: East Yorkshire

Re: Liberty - 1961 series 2 LI 125

Postby pazwaa » Wed Oct 22, 2014 12:59 pm

Had a sucsessful evening yesterday, got the frame fully stripped.

This is a beginners guide, any of you experience guys want to add comments/suggestions, feel free. ;)

Took this off first - is it a coil?

Image

You can just make out the two screws to remove.

Next i removed all the cables. These were in a bad way, so getting binned.

Cables on the top of the engine

Image

These were loosened with an allan key

Cable at the back of the engine, undo the nut and remove

Image[/URL

Unclip this wire

[URL=http://s1064.photobucket.com/user/pazwaa/media/Liberty/F3693647-21F4-465B-993B-D196BD817386.jpg.html]Image


Removed the kickstart, undo the bolt and slide off

Image

Next remove the shocker. undo the two nuts and tapped off using a hammer shaft

Image

Next undo the nuts holding the engine pivot bar

Image

once the nuts were removed, this came out with some light taps of a hammer, firstly on one of the nuts to protect the threads, then using a socket extension through the frame

And the engine drops. Move it out of the way.

Image

Next remove the rear brake pedal. Release the spring, undo the grease nipple and slid off

Image

Image

These are the removed components

Image

Then i removed the headlight, just a couple of screws. Remove the electrical connection block. Remove the two screws holding the top of the headset

Image

A few photos of the interanls of the headset. i removed all cables

Image

Image

Image

Image

Next remove the bolt holding the headset to the forks, you can see it part removed here

Image

and removed

Image

Remove the headset and your left with this

Image

You really need special tools to remove the nuts holding the forks, but a gentle tap with a chisel loosened the top once and a large c-spanner removed the second

Remove the forks

To remove the front wheel you undo the nuts, then knock out two washers recessed into the forks. these

Image

and the wheel drops out

Image

Next i removed the stand, undo a bolt for each bracket. Remember to undo the spring

Image

Components removed

Image

Thats it, frame stripped, took about 2 hours

frame

Image

Either strip the engine or sort the panels out next.

any comments/suggestions most welcome ;)

cheers
matt
pazwaa
 
Posts: 59
Joined: Fri May 30, 2014 8:13 pm

Re: Liberty - 1961 series 2 LI 125

Postby Rich Oswald » Wed Oct 22, 2014 6:52 pm

Fantastic detailed and comprehensive strip down. Thank you and very well done indeed,

Rich'
User avatar
Rich Oswald
 
Posts: 9606
Joined: Fri May 30, 2014 3:30 pm
Location: Wiseman From The East (East Of The Pennines That Is)

Re: Liberty - 1961 series 2 LI 125

Postby duncan1958 » Wed Oct 22, 2014 9:36 pm

Well detailed strip down will help you no end when it comes to the rebuild stage.
I would go with the panels next.
The mantra here would be...
Dry build
Dry build
Dry build.
Not wishing to insult however if you dont know this phrase ,its put ALL the panels on ,get your gaps and fitment right before getting any paintwork done.
Do not assume that the panels will fit nicely no matter how good a condition they may be in.
Enjoy.
duncan1958
 
Posts: 136
Joined: Sun Jun 01, 2014 5:14 pm

Re: Liberty - 1961 series 2 LI 125

Postby pazwaa » Wed Oct 22, 2014 10:30 pm

Rich Oswald wrote:Fantastic detailed and comprehensive strip down. Thank you and very well done indeed,

Rich'


Cheers Rich. Hopefully it will help others out a bit at some point.

Matt
pazwaa
 
Posts: 59
Joined: Fri May 30, 2014 8:13 pm

Re: Liberty - 1961 series 2 LI 125

Postby pazwaa » Wed Oct 22, 2014 10:37 pm

duncan1958 wrote:Well detailed strip down will help you no end when it comes to the rebuild stage.
I would go with the panels next.
The mantra here would be...
Dry build
Dry build
Dry build.
Not wishing to insult however if you dont know this phrase ,its put ALL the panels on ,get your gaps and fitment right before getting any paintwork done.
Do not assume that the panels will fit nicely no matter how good a condition they may be in.
Enjoy.


Cheers Duncan

Yep, took lots of photos whilst stripping down and everything bagged and labelled, so hopefully the rebuild will run smoothly (ish)! ;)

Dry build is a good call. Need to get the frame blasted first, bit of welding on the panels then ready for a test build. Would you primer the panels before a dry build, or leave them bare metal?
pazwaa
 
Posts: 59
Joined: Fri May 30, 2014 8:13 pm

Re: Liberty - 1961 series 2 LI 125

Postby dickie » Sun Oct 26, 2014 4:41 am

Toddy wrote:It will tell you all you need to know just about fella , just hope you find it :lol: :lol:

It won't tell you to fit a o-ring to your layshaft before you build your gearbox. You will realise just after you've finished the whole bloody thing! :cry:
dickie
 
Posts: 1864
Joined: Thu Oct 02, 2014 12:32 pm
Location: Tyne and Wear

Re: Liberty - 1961 series 2 LI 125

Postby lambrettatastic » Sun Oct 26, 2014 11:31 am

If you are wanting to do a proper job,then the rear mudguard will need to come off,as well as the chrome ring on top of the fork tube,and the bearing race at the bottom.
lambrettatastic
 
Posts: 58
Joined: Fri May 30, 2014 1:14 pm

Re: Liberty - 1961 series 2 LI 125

Postby pazwaa » Sun Oct 26, 2014 7:07 pm

dickie wrote:
Toddy wrote:It will tell you all you need to know just about fella , just hope you find it :lol: :lol:

It won't tell you to fit a o-ring to your layshaft before you build your gearbox. You will realise just after you've finished the whole bloody thing! :cry:


Dickie, please remind me of this in two years time when I rebuild everything :D

Matt
pazwaa
 
Posts: 59
Joined: Fri May 30, 2014 8:13 pm

Re: Liberty - 1961 series 2 LI 125

Postby pazwaa » Sun Oct 26, 2014 7:08 pm

lambrettatastic wrote:If you are wanting to do a proper job,then the rear mudguard will need to come off,as well as the chrome ring on top of the fork tube,and the bearing race at the bottom.


I've taken the rear mudguard off, but forgot about the chrome ring and bottom bearing race :( thanks for the heads up, will get them removed.

Matt
pazwaa
 
Posts: 59
Joined: Fri May 30, 2014 8:13 pm

Re: Liberty - 1961 series 2 LI 125

Postby duncan1958 » Sun Oct 26, 2014 9:34 pm

pazwaa wrote:Dry build is a good call. Need to get the frame blasted first, bit of welding on the panels then ready for a test build. Would you primer the panels before a dry build, or leave them bare metal?

I would advise some form of rust protection,bare metal can start to oxidize very quickly even from the touch of bare hands/sweaty palms :o
If the panels are going to need some work getting straight then go with a light coat of primer although its not water proof as such is way better than bare metal,then where repairs are needed it can be wiped off easily with thinners or sanded down.
duncan1958
 
Posts: 136
Joined: Sun Jun 01, 2014 5:14 pm

Re: Liberty - 1961 series 2 LI 125

Postby pazwaa » Sun Nov 02, 2014 9:34 am

duncan1958 wrote:
pazwaa wrote:Dry build is a good call. Need to get the frame blasted first, bit of welding on the panels then ready for a test build. Would you primer the panels before a dry build, or leave them bare metal?

I would advise some form of rust protection,bare metal can start to oxidize very quickly even from the touch of bare hands/sweaty palms :o
If the panels are going to need some work getting straight then go with a light coat of primer although its not water proof as such is way better than bare metal,then where repairs are needed it can be wiped off easily with thinners or sanded down.


Thanks Duncan, much appreciated ;)
pazwaa
 
Posts: 59
Joined: Fri May 30, 2014 8:13 pm

Re: Liberty - 1961 series 2 LI 125

Postby pazwaa » Sun Nov 02, 2014 9:49 am

This week was fork stripping, and it didn't go very well :oops:

First removed the hinge bolts and rubber stop bolts.

Image

All were easy apart from one hinge bolt, this one

Image

Tried tapping it from the inside with the nut on, but it deformed. Cut the head off the other side and tried tapping it the other way, wouldn't budge. Eventually I drilled a small pilot hole in the end so I could get a centrepunch tip located and it came out, very,very slowly :?

Next I struggled to get the fork links out, with the Pistons still locating in the fork cup. They came out eventually with too much force being applied by me, so the pistons got bent :oops:

Image

Should I have used a fork compression tool?

Anyway, the forks are now stripped, need to strip the paint, then a bit of fabrication for some shocker mounts next.

Are the fork rebuild kits on ebay any good? Or anyone recommend a good place to but replacement parts?

Thanks
Matt
pazwaa
 
Posts: 59
Joined: Fri May 30, 2014 8:13 pm

Re: Liberty - 1961 series 2 LI 125

Postby duncan1958 » Sun Nov 02, 2014 10:21 pm

Not supprised you bent the rods :o
You will need a spring compressor to reassemble for sure.
On the old forum a fellow memeber made his own and posted the diagram on here,I believe it was reposted when the system was up and running again.
I bought one of the spring compressors and had to modifiy it to work to my satisfaction,had I have seen the one I am talking of posted I would have made one.
duncan1958
 
Posts: 136
Joined: Sun Jun 01, 2014 5:14 pm

Re: Liberty - 1961 series 2 LI 125

Postby pazwaa » Sun Nov 02, 2014 10:41 pm

duncan1958 wrote:Not supprised you bent the rods :o
You will need a spring compressor to reassemble for sure.
On the old forum a fellow memeber made his own and posted the diagram on here,I believe it was reposted when the system was up and running again.
I bought one of the spring compressors and had to modifiy it to work to my satisfaction,had I have seen the one I am talking of posted I would have made one.


Thanks Duncan ;) yeah, rookie error, gonna buy a set of proper lambretta tools before the rebuild, including a spring compressor :oops:

Will look for the homemade one too.

Matt
pazwaa
 
Posts: 59
Joined: Fri May 30, 2014 8:13 pm

Re: Liberty - 1961 series 2 LI 125

Postby pazwaa » Wed Nov 05, 2014 1:35 pm

Little bit of bodywork last night

first to address was the hole in the panel

now you see it

Image

now you dont (sorry, terrible photo :shock: )

Image

then wirewheeled the top of the headset

Image

now a request. could someone send me a photo of the inside of an italian side panel. mine are indian, so need to know what i need to modify. also can anyone point me in the direction of how to mod my forks and lugs to accomodate shockers?

thanks
matt
pazwaa
 
Posts: 59
Joined: Fri May 30, 2014 8:13 pm

Re: Liberty - 1961 series 2 LI 125

Postby Nigel. S » Wed Nov 05, 2014 8:47 pm

Somehow missed this so just read whole thing from start. Great read. Always good to read these DIY rebuilds. Good luck with it.

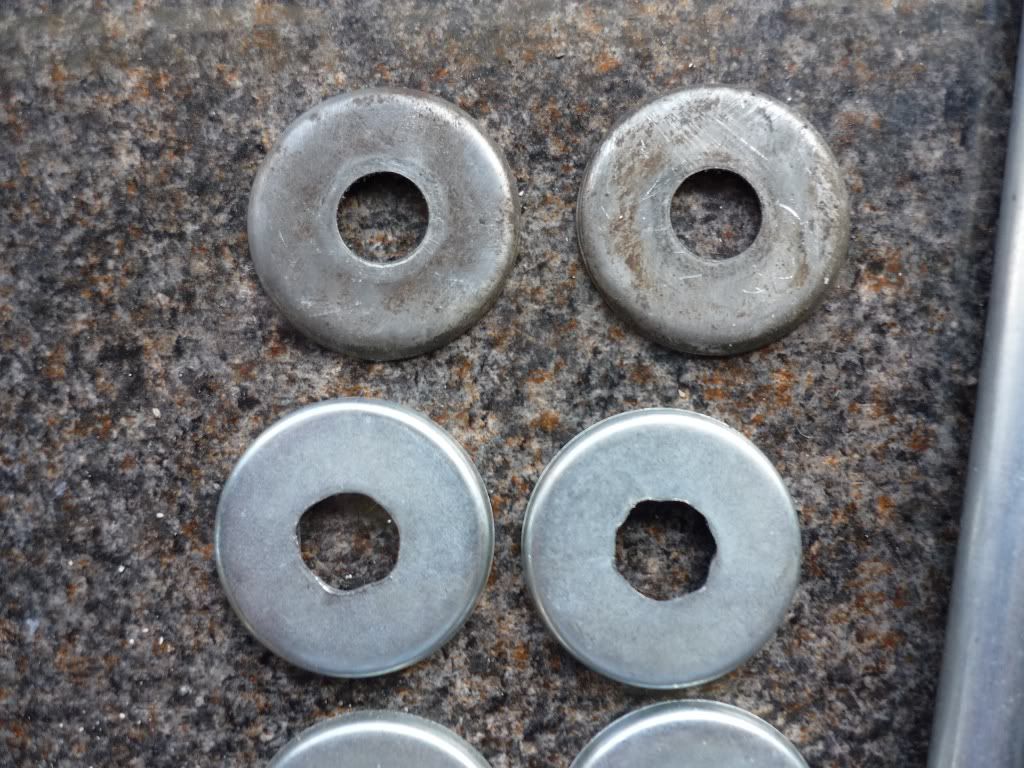
From my own experience only, I would pay a bit more and buy decent components for forks rather than a "rebuild kit". ones I had were woefully bad. Holes off centre through bushes, nuts/bolts with unsymetrical heads, just complete sh1te, but as I say that was my experience. It is tough if you're on a budget and you are confronted with a cheap option for something that costs double elsewhere. But there will normally be a good reason why prices are so different. Hope that helps, don't mean it to be a downer. ;)
Washers, believe it or not the lower ones were what was in the kit, top ones innocenti originals, guess which I used. And the dealer told me on the phone that they check all the components of their kits, check for what I wonder! Also balls on end of rods were wrong size (despite ordering kit with small balls :shock: ) and didn't fit snug into fork links and look like they'd been made with a blunt plastic spoon! Maybe it was just my choice of dealer that was the prob, can't remember who without going through receipts but hey, I'm over it now :lol:
Anyhow, keep at it. Great thread :D
Image
Nigel. S
 
Posts: 288
Joined: Fri May 30, 2014 11:47 pm

PreviousNext

Return to Show Your Ride

Who is online

Users browsing this forum: No registered users and 12 guests